By Fennie | 16 March 2021 | 4 Comments
How to Fix iPhone X Ear Speaker No Working - Jump Wire Solution
Since iPhone X, an iPhone ear speaker flex is prone to be damaged after many screen replacements. There are five main parts in the ear speaker flex:
1. An encrypted flood illuminator for face ID: which won't work after flood illuminator replacement.
2. An encrypted ambient light sensor for true tone: which won't work after ambient light sensor replacement.
3. A secondary microphone: A secondary microphone for sound recording when shooting a video.
4. An ear speaker: detail please read follow content of this article
5. A proximity sensor: Its faulty would cause the screen won't turn off or black screen when on the phone.

Previously, we fixed the ear speaker flex by transplanting the flood illuminator and replace the ear speaker flex. An ear speaker flex is not expensive, however, the transplanting process is risky for the main parts. In contrast, the jumper wire solution is easier and safer. In this article, we share the jumper wire solution to fix a damaged ear speaker flex.
Power on and test the phone, the ear speaker is not working. The loudspeaker is normal, the proximity sensor is normal, the face ID is normal, the true tone is normal, the video recording is normal too. Only that the ear speaker is not working.

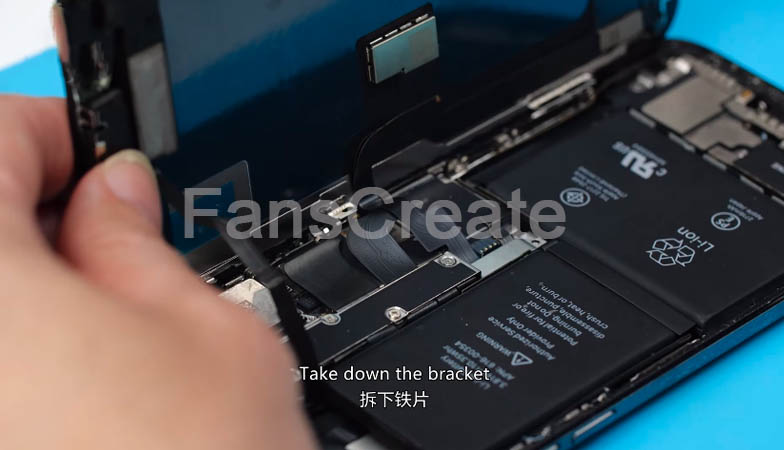
Takedown the phone, remove the screws on the charging port. Open the screen, take down the bracket, disconnect the battery, take down the screen.

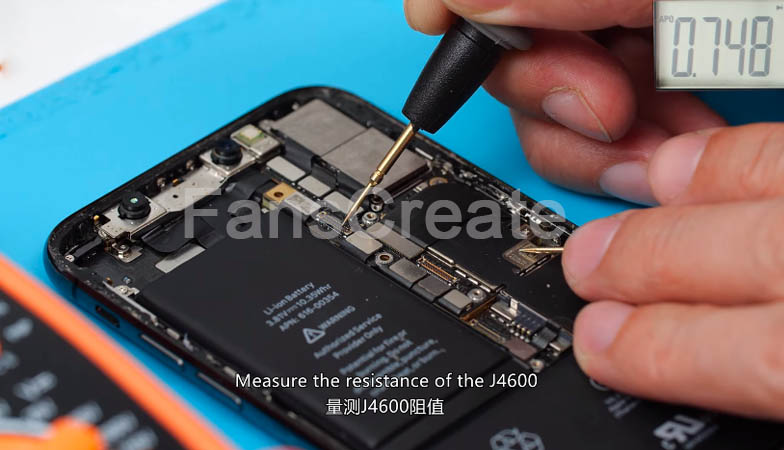
Measure the resistance of the J4600, all values are normal. Then measure the resistance of the ear speaker flex connector, all values are normal too.


Check the ear speaker flex, there is a crack. Takedown the ear speaker flex, it has been damaged. This circuit is the negative pole of ear speaker ringtone amplifier voltage, it has been broken.

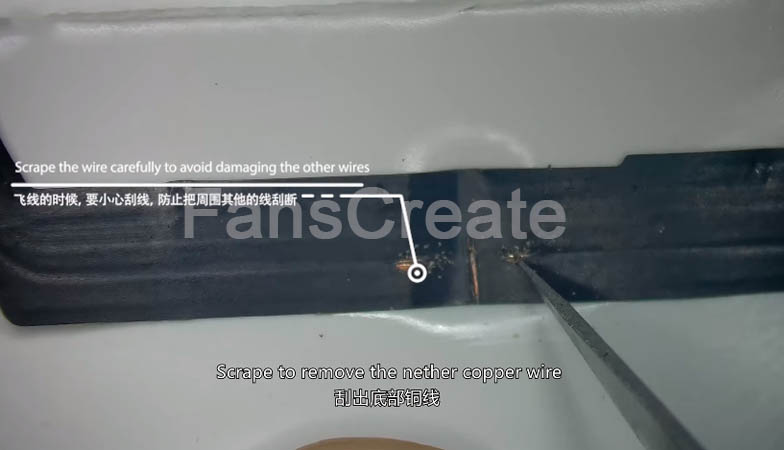
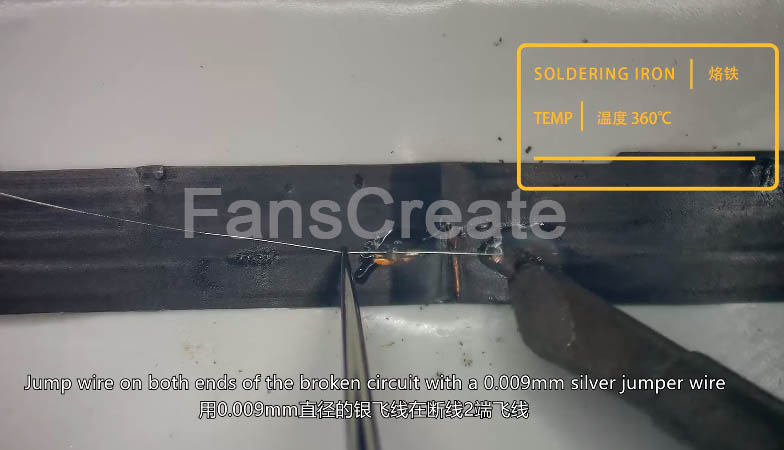
Place a silicone heat conductive pad under the microscope. Place the ear speaker flex, we will fix it by jumping wire. Scrape to remove the nether copper wire. Clean the flex, apply soldering flux. Coat tin on the copper wire, jump wire on both ends of the broken circuit with a 0.009mm silver jumper wire. The broken line has been connected. Clean off the speaker flex with PCB cleaner. Remove the redundant wires with a graver. Clean off the speaker flex with PCB cleaner.

Install the ear speaker flex. Connect the screen flex and battery flex. Install the phone, power on and test. The ear speaker works normally, the loudspeaker is ok, the proximity sensor is ok, the secondary microphone is ok, Face ID is ok, the true tone works well, problem solved.

Fix ear speaker flex by jumping wire is safer and more effective. However, you must be very careful in the operation. For instance, when scraping the wire, a careless move would damage the other wires. For the sake of safety and better operation, we can also apply a silicone heat conductive pad or double-sided tape to immobilize the flex.
Any questions, please leave a comment, we will reply to you soon.
Tools Used List:
Anti-static wrist strap
Screwdriver
Hot air gun desoldering station
Anti-static rubber mat
PCB cleaner
PCB holder
Solder flux
Graver
Jumper wire
Cotton swab
1. An encrypted flood illuminator for face ID: which won't work after flood illuminator replacement.
2. An encrypted ambient light sensor for true tone: which won't work after ambient light sensor replacement.
3. A secondary microphone: A secondary microphone for sound recording when shooting a video.
4. An ear speaker: detail please read follow content of this article
5. A proximity sensor: Its faulty would cause the screen won't turn off or black screen when on the phone.

Previously, we fixed the ear speaker flex by transplanting the flood illuminator and replace the ear speaker flex. An ear speaker flex is not expensive, however, the transplanting process is risky for the main parts. In contrast, the jumper wire solution is easier and safer. In this article, we share the jumper wire solution to fix a damaged ear speaker flex.
Power on and test the phone, the ear speaker is not working. The loudspeaker is normal, the proximity sensor is normal, the face ID is normal, the true tone is normal, the video recording is normal too. Only that the ear speaker is not working.

Takedown the phone, remove the screws on the charging port. Open the screen, take down the bracket, disconnect the battery, take down the screen.

Measure the resistance of the J4600, all values are normal. Then measure the resistance of the ear speaker flex connector, all values are normal too.


Check the ear speaker flex, there is a crack. Takedown the ear speaker flex, it has been damaged. This circuit is the negative pole of ear speaker ringtone amplifier voltage, it has been broken.

Place a silicone heat conductive pad under the microscope. Place the ear speaker flex, we will fix it by jumping wire. Scrape to remove the nether copper wire. Clean the flex, apply soldering flux. Coat tin on the copper wire, jump wire on both ends of the broken circuit with a 0.009mm silver jumper wire. The broken line has been connected. Clean off the speaker flex with PCB cleaner. Remove the redundant wires with a graver. Clean off the speaker flex with PCB cleaner.

Install the ear speaker flex. Connect the screen flex and battery flex. Install the phone, power on and test. The ear speaker works normally, the loudspeaker is ok, the proximity sensor is ok, the secondary microphone is ok, Face ID is ok, the true tone works well, problem solved.

Fix ear speaker flex by jumping wire is safer and more effective. However, you must be very careful in the operation. For instance, when scraping the wire, a careless move would damage the other wires. For the sake of safety and better operation, we can also apply a silicone heat conductive pad or double-sided tape to immobilize the flex.
Any questions, please leave a comment, we will reply to you soon.
Tools Used List:
Anti-static wrist strap
Screwdriver
Hot air gun desoldering station
Anti-static rubber mat
PCB cleaner
PCB holder
Solder flux
Graver
Jumper wire
Cotton swab
Recently Reviews
Read MoreLeave a Reply
Your email address will not be published.Required fields are marked. *
POPULAR BLOG
- How to Fix iPhone Xr Dim Backlight - Repair With New Backlight Module
- Aftermarket iPhone X Series Touch Issue After Screen Replacement Explained
- How to Fix iPhone X Ear Speaker No Working - Jump Wire Solution
- How to Fix iPhone With A Screw - Apple Wallet Payment Failure
- How to Fix iPhone 11 Touch Screen Not Working - Step by Step
ARCHIVES
CATEGORIES